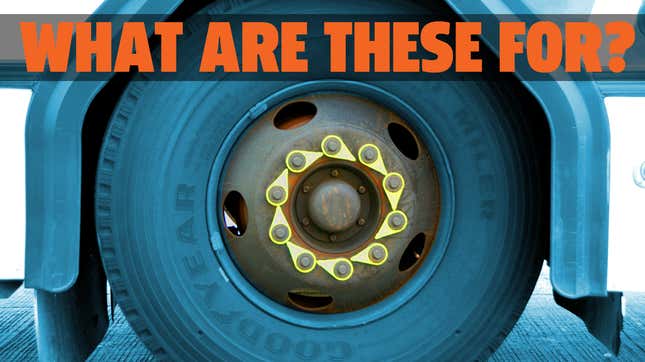
Have you ever woken up in a pool of your own sick on the asphalt of a big city’s bus depot and rolled over until you were face-to-tire with the wheel of a city bus? And, when you looked up at that wheel, body aching, wallet missing, and cold, so cold, did you happen to notice a lot of odd little plastic arrows on the wheel nuts? What are those, exactly? Why are they there? What do they do? And how will I get home? I’m here to answer some of these questions for you.
Those little plastic arrows are loose wheel nut indicators, and you’ve likely already figured out how they work before you finished reading this sentence.
In case you haven’t, here’s a little video from Wheel-Check that explains it a bit:
Wheel-Check is one of the makers of these things, and also one of the companies that claims to have been the “original” maker, though other videos, like this one, make a similar claim of invention:
Now, I’m not going to wade into the murky waters of who was the first to stamp out these little plastic doohickies, especially after seeing an absolutely brutal fight about this at my local fastener-enthusiasts’ bar, The Brass Wingnut, a fight that ended with one of the guys vomiting up a fistful of industrial brad nails.
Let’s get back on track here, though: see how these things work? When you first put on the wheel and tighten all the nuts properly, you then stick the little plastic arrow things on the nuts, making sure to align the arrows to one another.
There seems to be two main schools of thought about how to best do this, and I haven’t seen names for these two approaches anywhere, so I made some up:
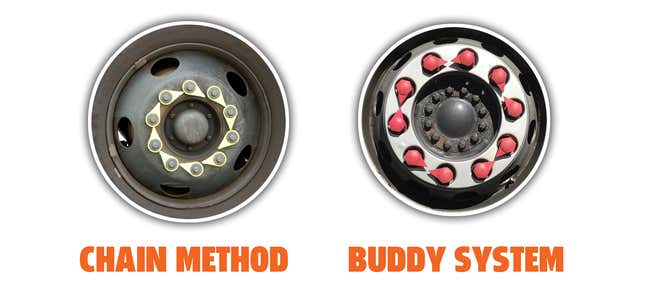
I think some vendors call the buddy system “point-to-point,” but whatever, I wanted to come up with a name.
In the chain method, the arrows point to the center of the next nut, and so on, forming an unbroken, flowing chain-of-arrows effect. In the buddy system, which can only work on wheels with an even number of wheel bolt holes, pairs of nuts are partnered up, and their arrows point at one another.
Either method provides easy, one-glance checking to see if any of the bolts have come loose, as you can see here:
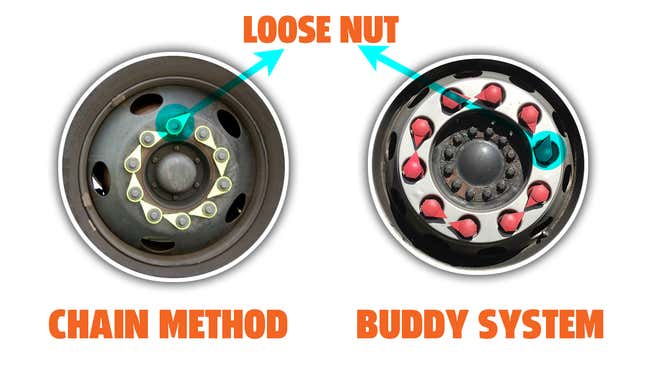
These cheap bits of plastic let a bus or truck driver do a quick walk-around and immediately be able to tell if any critical wheel nuts are loose, a huge safety advantage without requiring complicated checks or complex electronics. It’s so dumb and simple it’s brilliant.
You’ll notice they come in a variety of colors, too. Generally, green or yellow are basic indicators, orange tends to be for higher-temperature applications, and red is used to indicate when the wheel has been replaced, yet the nuts have not been officially re-torqued to spec. These seem to be sort of informal guidelines, so I wouldn’t necessarily guarantee this is always the case.
After looking around a bit more, it seems there’s another positioning school, which I’m going to call the Sunburst, which you can see on the right side here:
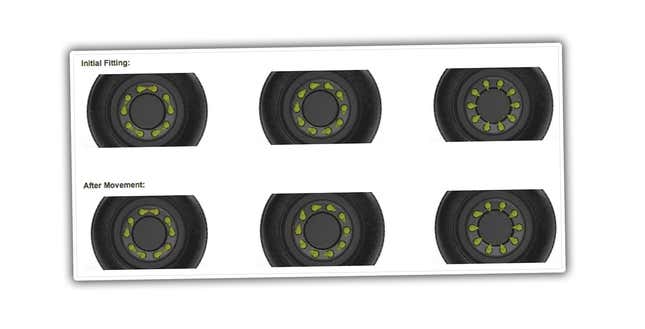
Really, as long as you have some consistent pattern you remember, I suppose it doesn’t really matter how you configure the arrows originally, as long as you can easily tell when one moves out of sequence.
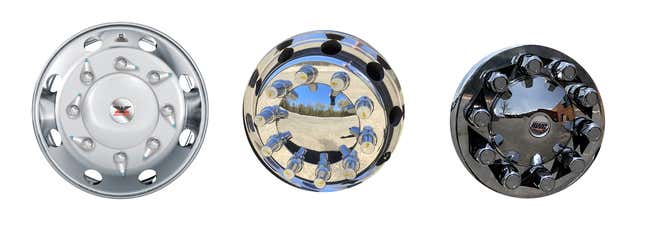
By the way, if you’re more fashion-conscious when it comes to your truck or bus wheels, I’m happy to say there are some more subtle, chromed versions of these indicators, so you don’t have to kill your look with day-glo plastics.
There’s another variant of these that takes a somewhat more active role in preventing wheel nut loosening instead of just calling it out when it happens.
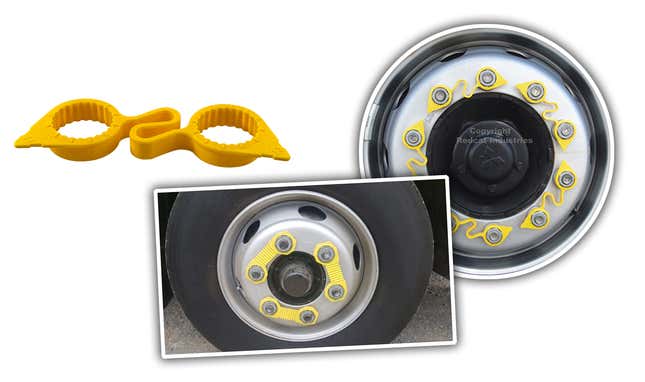
These variants have the arrow indicator, but are also paired with one another, and provide some physical restraint against wheel nut loosening via that plastic spring or strap between the two cuffs. If you have an odd number of nuts, though, this won’t work for all of them, of course.
All of these devices do sort of beg the question about why wheel nuts—or, really, maybe any nuts—come loose in the first place.
There’s a lot of factors at play here, not the least of which is the constant vibration and motion the nuts are under, along with the whole tendency towards entropy that the universe throws at us.
More specific reasons, though, seem to be these, as given by Torque Tight, one of the makers of these sorts of wheel nut indicators:
•Over torquing. Often users will over torque a wheel nut with the reasoning that tighter is better. However over torquing actually stretches the studs or threads beyond their ability to respond. It can also result in cracked, seized or cross-threaded nuts and cracked wheels
•Under torquing
•Joint settling after initial tightening and failure to re-torque
•Inadequate vehicle maintenance
•Thermal contractions This occurs when the nuts are mounted at shop temperature in a cold environment. As the nuts and bolt cools, clamping force is lost
•Improper mating surfaces. This is referring to non-flat mating surfaces, damaged or bent hubs and wheels, or worn or elongated bolt holes
•Poor bolt and stud quality
•Contaminants
•Dirt, sand, rust, metal burrs, and paint on mating surfaces when present on the threads or between a nut and the wheel surface can create “false torques”. Where the force is used to overcome friction and is not converted to clamping force
•Excessive braking. Excessive braking can result in high temperatures (especially among heavy vehicles) causing the wheel bolts to expand and contract as the temperatures vary. This causes the wheel nut to lose its’ grip on the bolt, resulting in a loss of torque
•Age. Over time wheel nuts and bolts degrade and the clamp force diminishes to a point where it is possibly insufficient to secure the wheel adequately
Of all of these, I wouldn’t be surprised to find that over-torquing is the most common issue, since a combination of powerful air tools and a weird human urge to always think more is better is something that we all seem to encounter.