I’ve been wrenching primarily in dark shitty hovels for most of my life. I’ve rebuilt engines in basements, swapped transmissions in rooms with dirt floors, and tore a 1968 Mustang GT apart bolt-by-bolt in a dimly lit former amateur butcher shop. When I moved out west where the cars are without rust, I vowed that I’d never do extensive work in a terrible shop ever again. Which is why I’ve halted all of my car projects to focus on getting our new garage into shape.

My wife and I moved into this 1935-build two-level house at the beginning of June. Our previous home had a gorgeous detached 1.5 car workshop in the back yard. It was insulated, it had a huge workbench, and there was plenty of room to work. When we downsized from that 1400 sqft three bed two bath in the suburbs, it was tough to find anything in the city with a garage, let alone a perfect one.
When we found this lovely duplex with beautiful wood floors, original doors, and a great location, that it had a garage at all was a huge bonus. I compromised on having a great garage, because I knew I could transform this one into a great place to wrench.

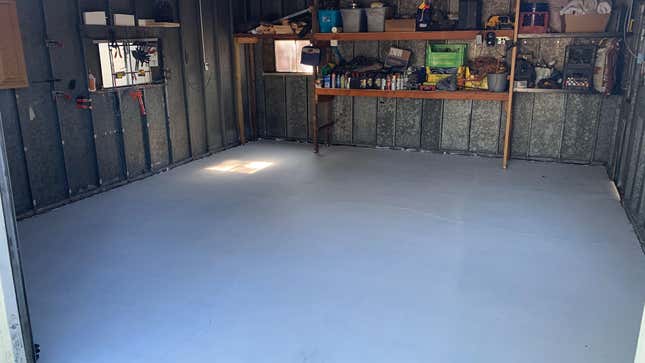
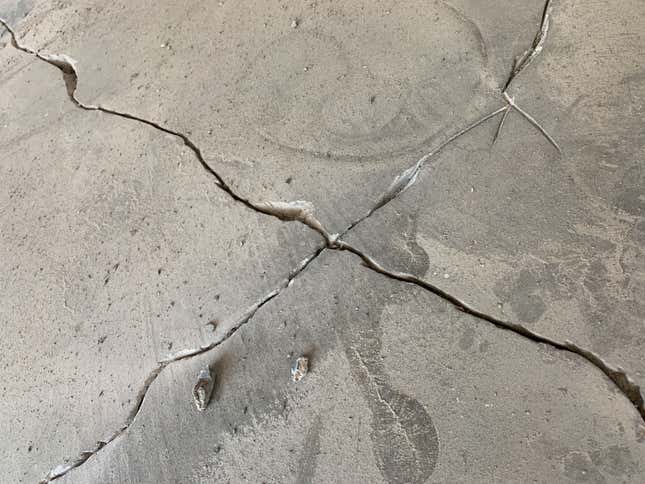
The building itself isn’t much to get excited about. It’s a concrete floor metal building about 17.5 feet by 19.5 feet with a height that extends from 8 feet at the sides to 11 feet at the peak. It’s water tight, not that it rains in Nevada very often, but hardly air tight. When it’s hot outside, the garage is hotter inside, and when it’s cold outside, this floor can be downright frigid. I’ll work on insulating the building soon, but over the Independence Day weekend I took the opportunity to address the cracked and broken floors.
On Thursday night after I got done making blogs for this here website, I trotted out to the shop to clear it all out. We’re still mired in the quicksand that is moving houses, so that was a struggle in itself. I shoved my bicycle, motorcycle, toolbox, air compressor, engine hoist, jacks, and the garage fridge out into the backyard. Four days later, all of that stuff is still in the backyard (again, thankfully we don’t get much rain), but now my floors are curing and I couldn’t be happier with the outcome.
Friday morning I woke up early to get a start on this whole mess. After a thorough sweep I wet down and squeegeed the floors to get the dirt and dust out. Then a proper wash with commercial grade driveway cleaner. I mixed half a gallon of Zep concrete cleaner into a pump sprayer with a gallon of water and worked it back and forth with a stiff-bristle scrub brush on a broom handle.

Later that day I attacked the many cracks with a Dewalt four-inch “turbo rim” concrete blade in my trusty old angle grinder. I figured that this would be the hardest part of the job, but at 15,000 rpm with a fresh blade concrete cuts about as easily as a hot knife through butter. I used the same blade to rough up all of the oil stained spots in the garage. I haven’t even had a car in this garage yet, but it’s probably older than me, so a few oil stains had developed. Epoxy doesn’t like to stick to oil, so getting down to fresh concrete was a must.
If you DIY this definitely wear a face mask and safety glasses, because that blade will fling concrete dust at a million miles an hour, and you don’t want that in your eyeballs. Even with a dust mask, I was blowing concrete grey boogers the rest of the day.

I now had to effectively start the whole process over again, because the concrete dust had gotten everywhere. Sweep. Rinse. Wash. Once that last wash had been done, I attacked the concrete with an etching acid. Just like roughing up a piece of metal to get your JB Weld to adhere to it, smooth concrete needs a bit of grit to it to get the epoxy to stay attached for years to come. A half-gallon of Seal Krete Clean-N-Etch in that pump sprayer with a half-gallon of water makes the concrete hiss as the acid wears off the top layer of smooth. This has to be done in small areas, as it shouldn’t sit very long. Again, I scrubbed the etch in with the stiff brush on a broom handle, then rinsed it off with clean hose water.

Friday night I cracked open two fresh bottles of Quickrete Concrete Crack Repair, a two-part polyurethane sealant that does structural repair to concrete. These cracks are likely from settling over the years, and don’t have any movement in them, so this bond should keep the cracks from spreading. At least, that’s the hope.
Of course, I didn’t have nearly enough of this stuff, so Saturday morning (after F1 qualifying, of course) I headed off to the home improvement store to get more. It isn’t exactly cheap, so I was more than a little bummed that I didn’t get more for my money, but so it goes. Two more bottles applied, and it was ready to cure. (Luckily, that meant I had plenty of time to sit back and watch the IndyCar race.)

The poly crack filler expands as it dries, pushing proud of the crack, naturally. With a four-inch floor scraper blade and a 16 ounce hammer, I was able to get the excess filler scraped off and flat. This obviously flings little shattered bits of cured poly all around the room, and you wouldn’t want to epoxy over those. So, once more with feeling! Sweep, rinse, wash. Rather than overdoing it on water and squeegeeing it out again, this time I used a mop and bucket to clear the floor of any debris.
Being that I’m in Nevada the wind whips little bits of grit into the garage through every crack and crevasse, so it’s important to keep the floor clean before the epoxy goes down. That night, after the winds died down, I gave it one last sweep and put the first layer of epoxy down. With only two doors to the garage, it was important to keep well aware of painting myself into a corner. I chose to go out the garage door, and kept that open for the whole process to cut down on fumes. For this little shop I needed two gallon cans of Seal Krete Epoxy-Seal.

Sunday morning (after the great F1 race, naturally) I put the second coat of epoxy on in a perpendicular pattern. The first coat was about a gallon and a half, while the second coat was only about half a gallon. If I’d had another gallon, I might have cracked it open to re-coat a few areas, but it looks pretty solid and uniform, even without it.
For this project I needed to purchase the wash concentrate, the etching acid, a scrub brush, the concrete crack chasing wheel, a three-pack of paint rollers, and the epoxy. In all, this project cost me exactly $233.76 and about four days of work. I still have to move all of my stuff back into the garage, but we’ll be generous and not count that. I also had help from my wife for the painting phase of the project, and it would have taken several extra hours if I’d done it myself.

Now that my garage floor is coated and the cracks are filled, I shouldn’t have to deal with trolly jack wheels or creeper wheels or rolling stool wheels sticking in cracks anymore, cleaning up oil spills will be way easier, and the white floors reflect a lot more light than the dark grey concrete, making it a much nicer place to work. After the insulation is up, I’ll be adding a whole lot more outlets and overhead lighting, so this garage is far from done, but it’s a big step in the right direction.
I’m always open to suggestions or tips. What would you do to make working in this garage easier and more effective?