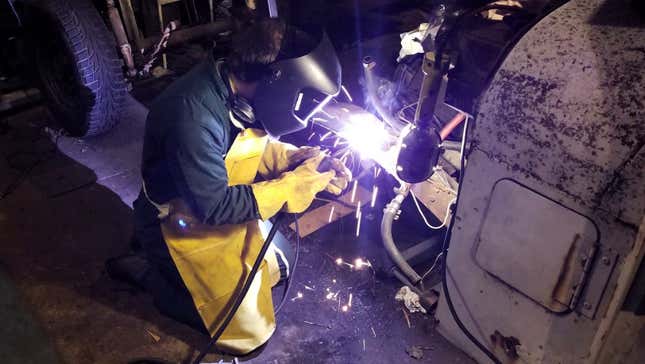
My biggest concern in preparing my dilapidated $500 Postal Jeep for a 3,500 mile trek to and from Utah has been the 20 inch long crater field of rust holes at the front of my left frame rail. Frankly, I wasn’t sure that it could be fixed. But last week, I grabbed my $100 Harbor Freight welder and it looks like I pulled it off. Somehow.
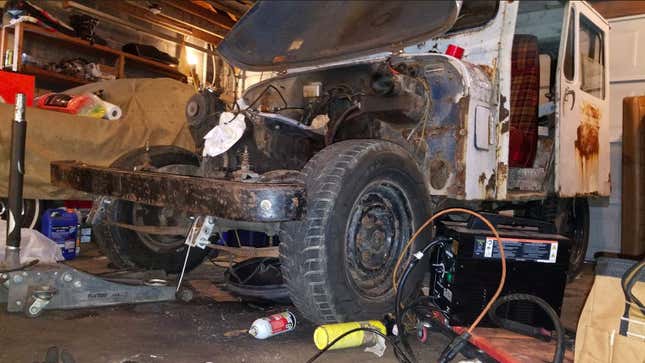
A recap for those new to my mail Jeep project, which I’m dubbing Project POStal: I let my overwhelming desire to own a Jeep DJ-5 Dispatcher get the best of me, so I bought one sight unseen from Indiana. Unsurprisingly, it ended up being a total crap-can, with the pièce de résistance being these rust holes on the front of the left frame rail:
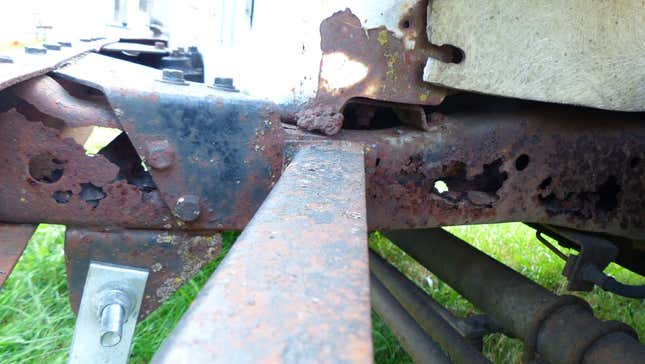
It looked mendable when I first saw it, but then I removed part of the bumper, and quickly learned that $500 was about 400 dollars too many for this rusty junker:
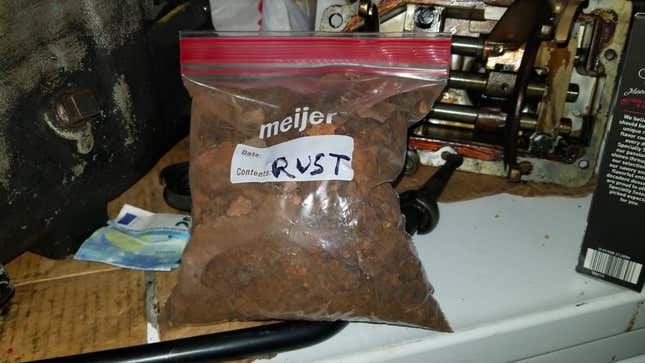
Just pulling the chunks of rust out of the frame, I was able to fill this entire bag with 3.5 pounds of Fe2O3, which I will add to my vast and ever-growing collection of the world’s finest, USDA Prime Choice, Grade A rust:
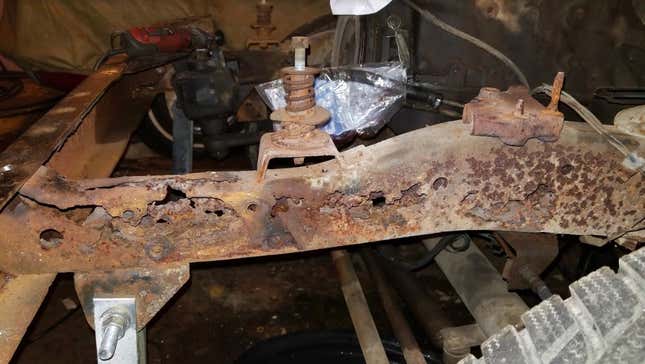
After scraping out the Sheldon Scale-rated “fine” bits of brown powder, I began cutting parts of the frame that, thanks to corrosion, had just become too thin to work with:
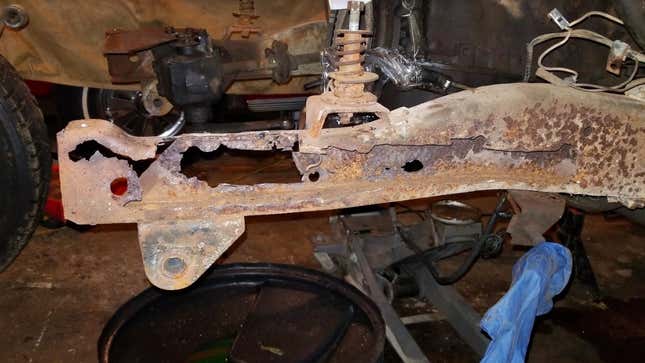
But the more I sliced, the more rusty and thin metal I found. My friend Michael, an amazingly talented fabricator who’s been building an awesome Jeep XJ on 40-inch tires, came over a few weekends ago to assist in the hack-job:
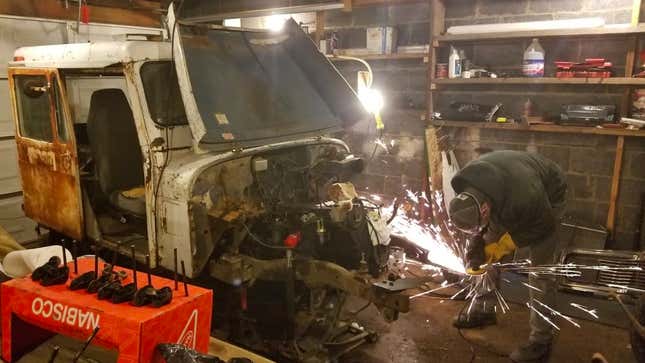
By the time the rot was all gone, the front nine inches of the frame retained only the bottom part of the original steel, and the 11 or so inch section behind that was now missing most of its outer wall.
Here’s how the frame looked after most of the cutting, but prior to slicing away a bit more of the outer wall, and prior to grinding down the bottom of the nine inch section up front to make it perfectly flat:

Though I was initially a bit concerned that this might not even be fixable, further reflection brought me to the realization that even my Harbor Freight Welder is more than enough to tackle this job.
First, the fact that I was able to take the Postal Jeep—even with its rotted out frame—on a test drive through deep holes in my backyard and on some pothole-ridden back roads without the frame incurring any plastic deformation at all made me realize that the loads going through that front leaf spring mount aren’t exactly tremendous. Obviously, higher speeds, bigger pumps, and tighter turns might have caused an eventual failure, but this is a 2,600 pound vehicle with only about 1,350 of those over the front axle. It’s not a diesel F-350 towing a mobile home.
And second, after looking through my factory service manual, and at the frame itself, I learned that the steel is only about 1/8 of an inch thick, which even my cheap welder and my novice welding skills can penetrate without issue. This was confirmed via lots of testing involving my sledgehammer coming down hard on 1/8-inch plates that I’d welded together as practice.
Still, even though I knew it was possible to fix the Postal Jeep, this was my first time repairing a frame, so I wanted to get some input from people a little better versed in fabrication. Luckily, after writing a story about some skilled Canadian wrenchers reviving a long-dead 1965 Ford Mustang Fastback, one of those wrenchers, Mike Bozzelli, reached out to me via Instagram to thank me for the story, and to ask about progress on my Postal Jeep.
After telling him about my frame quandary, he responded: “Well if you ever have any questions regarding welding, that’s what I do for a living. Would be more than happy to help.” Hell yeah.
Obviously, Mike’s not in Michigan, so he couldn’t check my measurements or my weld quality, but he was instrumental in helping me devise a plan to safely fix the frame. And after heading to my local Alro Metals Outlet for some shiny rocks, it was time to put that plan into action.
The first order of business was sliding a two-foot section of 11 gauge (that’s roughly 1/8 of an inch), 1.5-inch by 2.5-inch steel rectangular tube into the existing frame. This would act as a sleeve, around which I could build an outer frame to replace what had rotted away. Here’s a look at that sleeve in place:
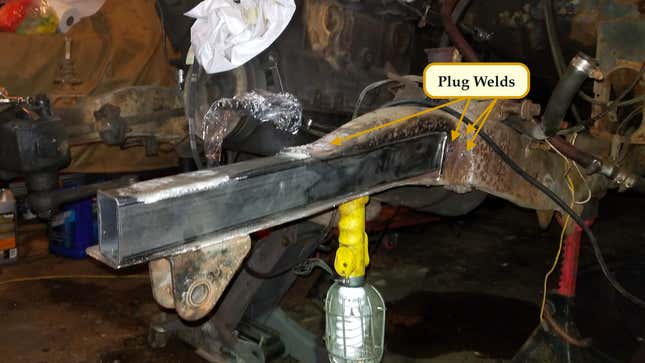
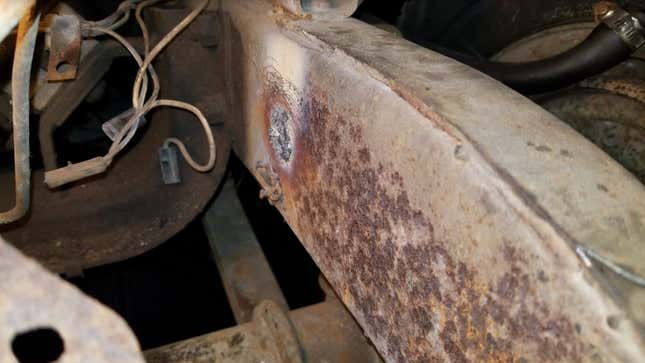
To tie that sleeve in with the remaining, non-rusted frame, I used an existing large hole on the inside of the frame rail, drilled three new holes on the outside of the rail, and also made a hole on top—all to act as locations for plug welds, which are welds that join two overlapping metals. You can see the upper and outer plug welds above; Here’s the one on the inside:
With the sleeve in place, my Jeep XJ-loving friend Michael set about cutting a patch panel to replace the outside wall that was missing from that second, roughly 11-inch long section of frame. To do that, he snagged a piece of cardboard and some scissors, and made this template:
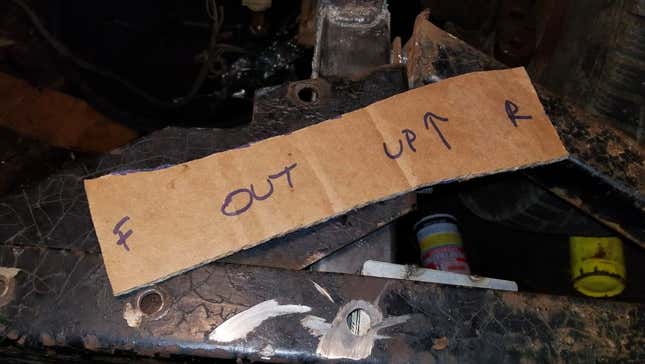
He then traced around the template onto some 1/8-inch plate, and cut the steel along his markings. After a bit of trimming, and after I drilled a few holes to facilitate plug welds with the inner sleeve, we had a nice patch panel ready to go:
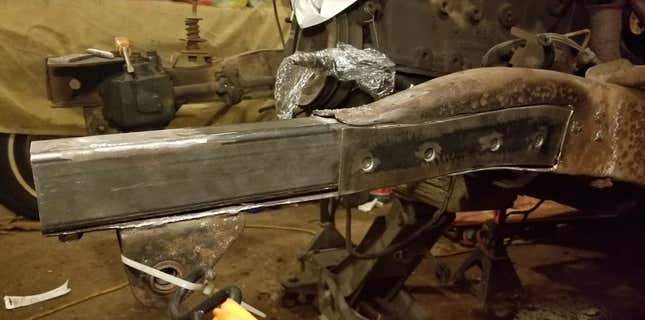
As for the front section of the frame, Michael cut out one of the two-inch sides of a two-inch by three-inch rectangular tube. This resulted in a U-shaped channel, which I inverted and dropped down over top of the front section of the frame’s new inner sleeve:
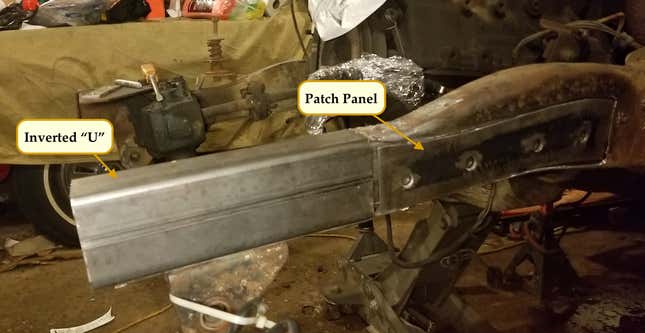
After we ground the edges of the patch panel and U, as well as those of the frame itself to give me some nice, clean metal to weld to, I got straight to it. Here’s the result prior to me throwing down four plug welds into the side of the ~nine inch upside down U at the front:
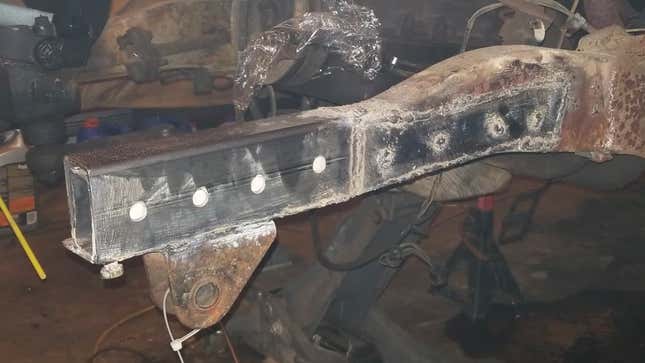
Here’s a look at the inside:

My welds, it should be noted, are not pretty. But it’s their strength that’s what matters.
Indeed, when I asked Bozzelli for his thoughts about them, he told me that they could definitely be better, but between that inside sleeve, the c-channel (or U-channel), and spot welds, he thinks it should hold just fine, though he recommends that I do some testing.
Again, as you can see, the upside down U making up the new front section of the frame is welded in the fore-aft direction to the flat bottom part of the original frame. Farther rearward, it’s also welded to the original frame on the inside and up top, and to the new patch panel on the outside. Plus, it’s plug welded to the inner sleeve in eight locations.
The flat bottom part of the front nine-inch section, which is where the leaf spring mounts and is the only remaining original steel in that section, is thus connected to the new frame via the welds at the bottom of the U, and on top of that, I drilled a few holes to tie in the bottom section with inner sleeve. This photo, taken prior to me welding up the U-section, shows those bolts:
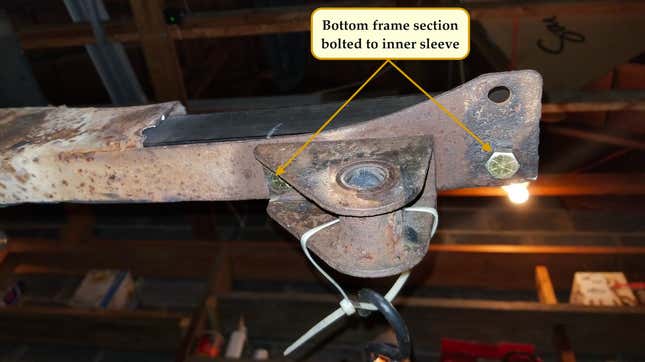
So that’s the basic setup: There’s simply a rectangular tube slid into—and plug welded to—the non-rusted-out part of the frame. Then there’s a patch panel welded up to fix the 11-inch section behind the front nine inches of frame. That front nine inches of frame has an inverted U over top of the inner sleeve, and that U is welded to the bottom of the frame (which is original), as well as to the second 11-inch section of the frame and to the inner sleeve via plug welds. And the bottom is bolted to the sleeve.
From there I welded the grille mount to the top of the frame, making sure it matched up with the measurements I had taken prior to cutting:
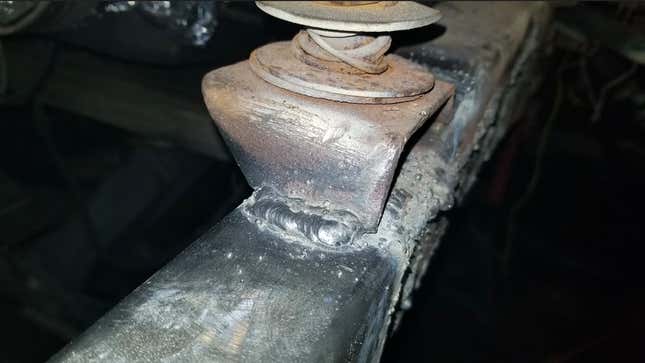
And I test-fit the bumper:
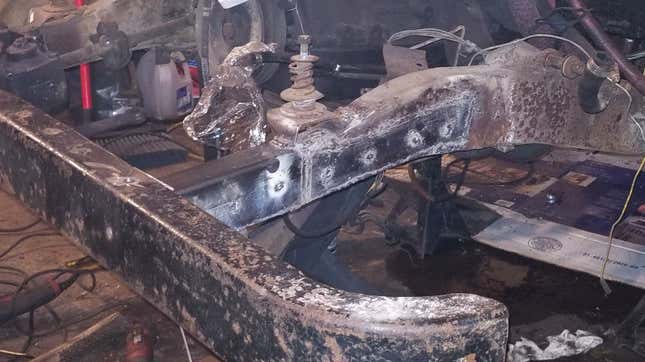
To fit the side bumper brace, I just welded a few studs to the outside of the frame, since I had no desire to drill four holes through four 1/8-inch thick walls. Unfortunately, the weld beads at the base of the studs meant the side brace coming from the corner of the bumper to the frame couldn’t go flush with the rail, so the brace is now a bit too long, and will need to be cut down to the right size. This isn’t particularly elegant, I’ll admit.
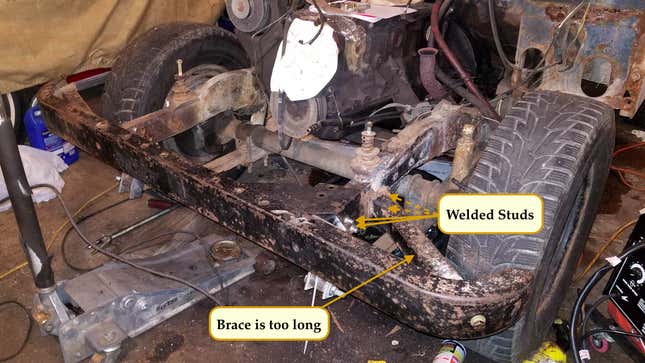
But anyway, after cutting the enormous leaf spring shackles down to approximately stock length, I bolted the axle back to the frame, and lowered the vehicle off the jack stands, putting load on the new frame for the very first time.
The thing feels rock solid. Though I’ve jumped up and down on the front bumper as hard as I could as an initial check, I’m going to be doing some real validation testing in some empty parking lots and on some empty back roads as soon as I find an un-cracked cylinder head for my AMC inline-six engine. I will hit the worst pothole-ridden streets Michigan has to offer at top speed, which in this vehicle will be about 50 mph, if I had to guess.
I’m confident that this frame will hold up well, especially after I weld on a few more braces, as recommended by Bozzelli. Still, I have a hell of a lot of work ahead. My steering shaft u-joint and steering box are both ruined, all of my leaf spring bushings are disintegrated and the sleeves are seized in place, my tie rod ends and ball joints all need to be swapped out, I’ve got to rebuild the carburetor, the electrical system is almost entirely broken aside from the lights and starter, the driver’s side floorboard is nonexistent (as are most of my body mounts), and yes, that cylinder head is cracked.
At this point, now that I’m certain that this project will, indeed, go on thanks to a—pending validation testing—successful frame repair, my focus is on that last item. If I can get the engine back together and running, it will not only give me motivation to continue working in my cold garage until I drop, but it will allow for so many other auxiliary systems (like the cooling system, headlights, other bits in the engine bay, and also the whole front end of the car) to be tidied up and prepared for the trek.
I have one month to get this done, but with many of the replacement parts being quite difficult to find (a rebuild kit for the right-hand drive steering box, and the rear leaf spring bushings, for example, are basically hens’ teeth), it’s not looking good.
Only my 1948 farm Jeep has drained me like this project has so far, and trying to get this thing done in time may cause all sorts of issues in the non-wrenching parts of my life, which, at this point, no longer exist. But that doesn’t mean my send it-o-meter isn’t pegged to max, because it totally is.